How to Make a WordPress Website For The First Time?

Make a WordPress Website

Why is it really necessary to build a WordPress website? Just for the sake of finding this answer, let us consider a situation. You met your old friend after a while and you start telling him/her about your new business and all that. Suddenly, what if he/she asks about your website address? What are you going to do in such an embarrassing situation?

Right now, you haven’t really tackled what you see as the overwhelming problem of creating a website of your own. You like using the WordPress and you know how to use it. Also, at the same time you have no idea as to how a WordPress website can be made.

>>> Offshorededicated.net is a Cheap Offshore Hosting Provider

Creating a new WordPress website and learning how to build it as perhaps not as difficult as it seems.

Make a WordPress Website

How to create a WordPress website โ€”A perfect guide for beginners

There are a certain things that we’re going to cover in this piece. Also, it is important to understand that a little bit of knowledge in addition with correct tools can make wonders for you. You can make a stunning website that would be worth showing off. Below are some of the things that weโ€™re going to discuss.

  • What is WordPress?
  • Who should use WordPress?
  • How does it work?
  • What to you need to create a WordPress website?
  • The easiest way to create a WordPress website?
  • How can you install website manually?
  • You will also know about WordPress dashboard.
  • Setting your URLs by configuring permalinks.
  • Choosing themes for your website.
  • Addition of content on website.
  • What is next?

If youโ€™re ready, we can start building up our brand new WordPress website.

What is WordPress?

In simple words, we can describe the WordPress as the most famous content management systems (CMS) around the globe. WordPress is powering more than one-third of all websites and while it may sound a bit technical, we are assuring you that it is quite simple as well.

“That is exactly what a content management system does; it controls the presentation of content.”

You simply present on your site what you want to say, and the CMS looks after how it shows. This makes a CMS great for someone who wants to create or manage a website that looks professional without needing to obtain a new computer programming degree.

You’d find a plethora of options when it comes to content management systems. However, we’re only going to focus on WordPress. It is supported widely and also it is extremely easy to customize. The best thing about WordPress is that it is absolutely free and you will only have to pay hosting charges.

Overall, the platform of WordPress is fantastic, flexible and extremely polished for all of those looking to create their new professional website. You also don’t need to learn coding in order to be able to make a WordPress website.

Who should use WordPress?

Bottom line, anyone wishing to create a website that is easy to maintain but highly customizable should learn how to develop it on WordPress. WordPress is mostly considered a blogger forum, but it works well for various website styles as well.

A tiny enterprise that needs an online advertisement presence, families who want to keep their loved ones up-to-date with pictures and news, and professionals providing their public services will gain from WordPress. Also, it is great for bloggers as well.

How does WordPress work?

It is just like framing your new house. Think of this way, WordPress is your framework and you’re going to start your house with framing first.

โ€œConsider WordPress as the website’s skeleton.โ€

It is the foundation and supports all the main features that you need. Next, the content will be included. The text, pictures and videos you use for transmitting your message to tourists. Think of it as your house, these are the furniture, pictures and other stuff on your website.

Your theme manages your site; the colors and design of your website are all aspects of your theme. This is your painting and tapestry in your house. You don’t need to buy a new house in order to change the color schemes and overall look of your house. It means, you can change everything according to your desires when you’re learning to create a new website on WordPress.

This is where you have the tremendous benefit of building your WordPress website. You can adjust your template without re-creating your pages once your content is initially configured.

โ€œThe beauty of WordPress is that without starting from scratch you can easily edit content, add features or fully overhaul the site.โ€

Without changing features, you can extend, delete or edit content. Additionally, without sacrificing any content or recreating your page layout, you may opt to adjust the look e.g. your website theme.

WordPress can do a lot from the box, but what if you would like to add features? It is here that plug-ins come into play.

You can install your WordPress website in order to add features to the plug-ins. Think of these applications like adding features to your mobile device. If you’re searching for anything that WordPress does not provide by default, you can add enhancements to the basic structure.

What you need to build a WordPress website?

Here comes the most crucial part. What would you need in order to build a perfect WordPress website?

For a website to work properly and professionally, you will have to get two key components. You’d need a domain name that also serves as your URL or website address. Secondly, you need hosting as well for your site.

People will follow and access your website with the help of your domain name or by entering your URL in the search bar. On the other hand, hosting means the physical components that store and serve the files on the website.

We’re throwing away a piece of advice that you might need in the future. Do not look for discount hosting in the start. You’d need a proper hosting company to host your address and the ‘discount’ hosting can cost you in the longer run.

First of all, secure your domain name and hosting.

WordPress is built on these plans automatically and configured. And activities including automatic core app updates, website backups and malware detection are done for you with managed hosting.

You can download the new version from WordPress.org if you want to do so with an unmanaged Hosting plan and install WordPress by yourself. Any hosting service works as long as both a database for the storage and a file uploading place is available. Below we are going to cover self-installation.

When you have secured hosting and registered a domain name, you will need to obtain a couple of other items in order to make your site work.

  • Material and data โ€” what do you say?
  • Images and/or videos โ€” since a website with just text is incredibly poor.
  • Theme โ€” WordPress has many defaults and several free themes can be selected outside the default choices. If you want a particular look, online outlets like ThemeForest are also available for purchase.

What you DONโ€™T need to get started:

Costly editing or web design software โ€“ everything is created in WordPress from your browser, added and edited as well.

WordPress is open, hosting plans are very cheap, and the rich uncle or family inheritance should be avoided.

You won’t require a degree based on advanced computing or mathematics and physics. Once you have got the basics right, it won’t be a problem to tackle the WordPress. It’s incredibly easy.

The easiest way to build a WordPress site:

The best way to set up WordPress is to begin with a specially built hosting account for WordPress websites. For instance, if you choose a plan WordPress Controlled Account, you will get an installed WordPress already.

WordPress hosting makes it easier to create your first WordPress website with a Quick Start Wizard, pre-constructed themes, core software updates, 24/7 support along with daily updates as well.โ€

Many hosts give a simple alternative or instructions directly on their control panel to install WordPress. You can skip the next section when WordPress is already enabled on your website.

How to install WordPress manually

If you are an ambitious kind of a person, and you want to install WordPress yourself, we still have you equipped; we need to do a little setup work before you can install WordPress. Let’s manually set up WordPress.

  1. Create a database

We will begin by building a database. A WordPress Website varies greatly from the “ordinary” website we once assumed. When the Internet was fresh and new for everyone, it was nothing but just a series of files stored on a computer.

WordPress is different and so are its functions. You will see your site generating from a range of files that were stored on a server and all the information and content that were accessed from a database. It means, firstly we need a database to setup our WordPress website.

To log into your hosting control panel, or cPanel, you should have been provided credentials. When logged into your dashboard, you can view a range of choices. We want to begin by finding the Databases part. We will use the MySQL Database Wizard to create a database.

To create your database, follow the wizard instructions. You must enter a name for a database and generate a password for a database user. Ensure sure that the user has “All rights” in the database when needed.

Don’t forget the database name and username along with password as well. You’re going to need them.

  1. Upload the WordPress files

We’ll load up the files that WordPress needs next. You can also download the latest edition of WordPress by visiting WordPress.org. Switch back to the dashboard of your cPanel and choose your file manager.

You want to configure your own files, once you are there, follow this link on the public html folder. Click Upload and upload the files from WordPress.org that you just saved. When the file is saved, go back to the main window of the File Manager. Click right on the file and choose Extract. The unpacking will take a few minutes to complete all the files you need for WordPress in your working directory.

After completing, under your “public html” tab, you can find a “WordPress” directory. Click on the folder and pick it all from there.

Click Move to transfer all the files into your pubic html directory at the top of your computer. The WordPress archive and the original zip file can now be removed. You will now have a file structure that looks like this if you did this correctly. Let’s just hope you did.

  1. Install WordPress

Go to a web browser for the last move and visit any domain name you’ve selected on your website. It will automatically start the installation process by requesting a language choice.

  1. Enter your database credentials

Do you remember the credentials we saved from before? You’re going to need them here. In the corresponding boxes type the name of the account, username and user password. For the hostname, most hosts use local hosts. Your web host will send you this information if you are unsure.

Also, the default table prefix is a good idea to switch from wpย ย  to something else. What you choose doesn’t matter; it just varies from the norm. To continue with the download, press Enter.

  1. Set username and password

You can now enter the username and password for your new WordPress account. These credentials are the last ones you’d need to visit your WordPress site.

โ€œYou can also change the ‘admin’ as a username and shift to something more professional and something you can relate yourself to.โ€

This is the default username generated by the site itself, which raises the probability that your account may also be hacked at some point of time. Pick or let WordPress create a safe password for you. Give a title to your website and continue the installation if you like.

And that’s it; the WordPress is now installed on your computer.

Getting to know the WordPress dashboard

When you learn how to develop a WordPress website, you’ll monitor all aspects of the project in the dashboard. Enter the dashboard by going to your browser’s โ€œyourdomainname/wp-admin”. Log in with the username and password you built in the last installation stage.

This dashboard is the core of WordPress for everything. Where can you begin?

We can start with a brief overview of the various areas you can use to add content and customize WordPress for your platform.

Your website consists primarily of articles and articles. Contents that are frequently modified, including blog posts, are typically included in postings. It is easier to use pages for content that does not change as much, like โ€˜About usโ€™ or the contact address.

Almost all of the themes reveal your latest posts by default on your home page E.g. blog posts.ย ย  But, if you like, you can change this to always display a static link. This choice is available under the Settings tab in the left menu, as well as other options-such as setting the time area or changing the e-mail address of the administrator.

You will monitor your theme and all the information about the visual presentation of your website on the appearance page. You can pick themes and upload them, build menus, and decide with widgets what will appear in your sidebar menus.

In the Plug-ins menu you can access installed plug-ins and add new plug-ins as well.ย  Any plugin built on this page will appear on your WordPress website. Only plug-ins that is available on your website for usage is the activated one.

Occasionally a new menu element is added to the left menu when you activate a plugin (this menu can also be removed). However, many of the menu items already in use are new options introduced.

The media library is where the photos you added to your WordPress site can be accessed, edited or removed. Each image should appear in the media library, regardless of where it is inserted. For example, from the post or page editors screen you can add a picture in a post or page as well.

The pictures are in the gallery now. The content portion of your pages can be found for you to add an image directly to the Media Gallery. We can start by doing some simple setup work now that you know different places. Start with the URL structure configuration.

Setting your URLs by configuring permalinks

WordPress uses a method of URL writing by default which is not easy to use as an SEO (such as search engine optimization). We want to change this configuration to increase the performance of search engines on the website pages.

You can always start by configuring your permalinks. However, you should not wait to complete this task because you’d find a range of other ways where you can start publishing your blog posts and pages. Also, there are many SEO tricks that can be used later on. However, you should definitely start by setting up your permalinks.

You’d see the setting category link in the Dashboard on the left side navigation. You can choose select settings and then permalinks. The Plain URL writing rule is going to be chosen by default and you must change that. To do that, you can select the post name and click save changes.

What did you gain from it?

Normal, “messy” URLs for post IDs are used by WordPress. We’ve made them easier to read and consumer-friendly. This will not only allow our tourists to find their websites, but it will also work much better for SEO purposes.

When we add content, we can now start concentrating on the Web display as WordPress generates “pretty” links.

Choosing a theme for your WordPress website

Although content is the most important part of creating a WordPress site, you should also pay close attention to your theme. The theme is how your website looks and how it gives your visitors an overall feeling. First impression is the last impression sometimes so, be careful in choosing a nice looking theme.

You will have to keep a lot of things in made when you’re looking to select a particular theme. On the other hand, anyone can design a website without any know how about developing. You would like a theme that looks stable, clean and neat to work with.

Also, there is another important aspect of choosing a theme and that is to make sure it responds well to all kinds of gadgets. It means it must appear nicely on all types of desktops, tablets, mobiles and different screen sizes as well.

There are lots of themes that are highly customizable as well. They will allow you to change the color and background with a lot of ease. It will definitely give you a more stable and attractive look to match the idea behind your WordPress site.

Adding content to your WordPress website

There is just a simple way of adding your content to the website or blog. You can simply add them through a page of a post in the WordPress. Both of them are handled in pretty much the same way and after the release of the WordPress 5.0, the method of content addition to the website has changed noticeably.

WordPress uses what the Gutenberg publishing business is doing, which you can read in depth in this excellent post. However, here is what you need to do if you want to live with the classic WordPress editor.

There are other things you need to keep in mind as well as far as the WordPress dashboard interface is concerned. On the right side, you’d see an option of a featured image and you can choose your thumbnails and other images in that category.

It will go down with your content on the website. You can also see the ‘save draft’ option in case you need to make some changes to the content before publishing it live on the website. If you insert a featured image, it will automatically set it to thumbnail. You can only see the posts that are published.

Whatโ€™s next?

You will learn more about how to automate your SEO website and how to protect your WordPress website. When your WordPress website searches and operates as you wish, you can proudly share it with the world.

We couldn’t touch the surface of so much that WordPress can do. Are you ready for more information to be unearthed?

You can start with your social media post by attaching a link to your website. Attach your email signature to a website link as well. Using a plugin to start making an email subscriber list and there are infinite possibilities.

Whatever your needs, it is simpler than you might have imagined to create a WordPress website for the first time. Now enjoy the fun and start creating more.

How to Edit WordPress themes? Complete Guide

Edit WordPress themes

The community of WordPress is simply incredible. You’d find a vast range of work that is available on the platform. From web developers to designers and bloggers, you’d find almost every expert there.

Edit WordPress themes

All these expert players from different industries sometimes need to change or edit the themes of their existing WordPress blog. Also, the entry level for ‘hacking’ is pretty low and that is good news for us.

It wouldn’t be wrong to say that all beginners in the hacking industry start off with WordPress. We also started it when someone we knew needed some help with his WordPress themes. We were not aware of anything regarding the WordPress itself but we had a fair bit of knowledge about PHP.

So, we jumped in and started our mission regarding the edit of themes. If we recall that day, we probably would have done things differently. However, our main focus is to tell you guys and let you know how you can do it in the ‘WordPress style’.

5 methods to edit WordPress themes

To make changes or edit your WordPress themes, there are five most commonly used tricks and they’re perhaps easier than each other.

  • You can do the CSS editing through the WP Customizer. It will bring changes to the style of themes without modifying the theme files at all.
  • You can also edit the theme files directly.
  • You can also begin a child theme while preserving the parent theme at the same time.
  • You can also fork a theme; it means you can always make a copy of the theme as well.
  • You can also write a new plug-in by using hooks and filters to change functionality.

As we explore how to edit WordPress themes and cover the theme editing slightly, we will concentrate on CSS as we start a child theme. Title of this article does not involve the forking and writing of plug-in topics. You will need some stuff, and a few tips however.

  • Be ready with a backup
  • SFTP access to the site should be in your pocket
  • Donโ€™t look at the WordPress editor
  • Donโ€™t indulge yourself into Cowboy coding

Make sure you have a backup

It is extremely important to have a backup ready before you start editing your WordPress themes. Get a proper backup from offshore web hosting company and there are many options for that. You can get the help of ManageWP as a secondary backup for your site.

โ€œIf you don’t use ManageWP at this time, register. It offers a free backup option for once a month. Switch on and run this tutorial until your start your work.โ€

Get SFTP access (or just FTP)

You need a way to connect to the server if you want to change theme files. You can use Filezilla while you’re on Windows, Mac or Linux. It’s open and safe. To associate it to your web server, install it and then activate it.

Avoid the WordPress editor

This step is perhaps the most important one to keep in your mind. Don’t go for the direct way of choosing the WordPress editor for your theme editing. At the start, you will find it easy but you never know, if a single semicolon or a comma gets misplaced here and there, you might end up taking the whole website down. So avoid the WordPress editor at any cost.

What is Cowboy coding? (It should be avoided as well)

We’re not here to deliver lectures on coding ethics and standards because there is no gain from it. What we do know is that a proper and a full-time dedicated developer will surely take his time to set up the website locally with MAMP, WAMP and Vagrant as well.

We’ll do what is called ‘cowboy coding’ by missing this step and it is not the best practice at all. That is exactly why we’re saying that avoid it if you can. You won’t edit code on a live website, so please do not hesitate to go to the next level for local Google development.

โ€œWhen you want to become a developer, local development should be your primary objective.โ€

Weโ€™re going to use MAMP for local creation for my examples. But it’s possible that you must download, edit, upload and refresh the page to see the amendments. This is a simple way to start finding out how to edit WordPress themes, but if you want to become a developer, local development should be your target.

Letโ€™s dive in

We shall use a local site for this article at http:/dev.dev. And don’t try to open it because it won’t as it is built on our machine locally. I shall use it on this post. These three types of WordPress modification need different levels of ability. We will begin with the simplest method and will spent most of the time there.

CSS edits

We’re saying this again that the easiest and simpler method of bringing changes to your WordPress website is by making the CSS editing. The 4.7 version is already released and there is a built-in way to edit the CSS. Also, there is no need of editing the CSS theme directly.

Only sign in to WordPress and pick Customize from Appearance:

Once the customizer opens, you will have to choose the Additional CSS. This takes you into a vacant field in which you can begin to drop in CSS.ย  We have slightly scrolled it down for you to see the content directly, not just the header picture.

You can now start to make adjustments. You must know how to target CSS components, so let is begin. I’ll pick Chrome for a CSS component, but the same feature is available to other browsers as well.ย  Start by right-clicking on an item, for instance, the blog title Hi! Or whatever you like. The inspector will pop up when you right click on it.

You can see what the title item is called once you press Inspect. The title of the article in this case is an H3 tag with the entry title of the class. Any CSS you like can be added here. In this case, we’re simply looking to add a red border by adding the following code.

When you know how to edit WordPress themes, you can add CSS to any feature. As you are aware, the theme files are not changed, and the CSS is saved in the database.

Make sure you look at the classes of the body when you seek to locate an object however it should only be on a certain page or post kind. The WordPress is a freaking genius. E.g. we get a lot of handy and important information about it if you click and load the first blog post.

We know the default template is loaded, there is only a single page and the post ID is 1. You can also try something like that.

You’d only witness the border on the web page with the post ID 1. However, if you’re looking to remove the title from the pages but you want to keep them on your posts then, you can simply visit the page and check the classes in the inspector. Now, the next step is to add this CSS to the customizer.

A lot of CSS tools are available there. CSSplay offers clear examples of what to do. Only note that by looking at the User, you can get a lot of knowledge on lessons incorporated with WordPress.

Theme edits

โ€œIf you want to create a permanent mark, theme edits should be made. Change only the theme files if you are 100% certain that another update is not needed at all. You’re going to lose all the files that were once edited by you if you are using Genesis, Elegant Themes, Divi, Avada etc once another update strikes in. In that case, you will have to jump to the next step.โ€

Alright, now you have your theme that is not going to be updated ever, the next step from here on is that you just FTP it. After that, you’d need a file to be selected for modification.

We will just check and investigate that in your themes directory but, most of the time it will look something like this public_html/wp-content/themes/_name_of_theme.

The CSS can be modified and the same code from the above section can be entered. Delete the customizer’s code, edit the.css style at the theme’s directory root, and then apply it to the file end. You can edit any file when you’re ftped in. You have this backup and you made it easy. Be cautious, anyway.

Child theming

When it comes to child theming, it is more of developer’s cup of tea. However, you can also visit the WordPress codex in order to learn about creating a new child theme. With the help of this article, you can also learn as to how you can create your first WordPress child theme. It will also help you understand and learn creating a child theme based on the Twenty Fifteen theme.

We also encourage you to learn how really WordPress operates through this manual process. But if you are unable to build a child’s theme from the start then plug-in is always there to help you out.

The Child Theme Builder is a free plug-in for generating the child theme. Simply install the plug-in, trigger it, and fill out the form to start its creation process.ย  You should also understand that many conceptual businesses are there to help you with child themes and they also provide them ready made.

For instance, you can get a child theme easily from the Beaver Builder’s theme so that you can make changes without having to scratch out a child’s theme.

“Also note, a child’s theme can have any theme โ€” if it’s not already a child’s theme.”

The good thing about the child’s theme is that WordPress will first scan the child’s directory for a file, then load the parent theme file if not found. For instance, if you want to change the footer of a theme, and only the footer, by following WordPress.org instructions, you can construct a child’s theme. Just copy footer.php and insert it in the directory of the child theme while simply taking it from the parent theme.

If you’re taking help from the FTP to change and modify themes on WordPress, this is perhaps the only best possible way to do so. The WordPress will first bring up the footer.php that is found in the child theme whereas if it isn’t found, it will automatically load the parent theme.

Wrapping it up

In this never ending sea of knowledge regarding the WordPress, you will also learn a few new things that we missed in the article. However, we will surely try and provide you with intricate details as to how you can fork a theme and how you can write a plug-in to change the theme. All of that will come in a separate piece soon.

[Fixed] “Another Update in Process” WordPress Error/Issue

Another Update in Process" Wordpress Error/Issue

How To Fix WordPress “Another Updated in Process” Issue

Another Update in Process" WordPress Error/Issue

An error screen as above is sometime seen by WordPress users when they try to update their installation of WordPress. It normally goes away after a few minutes when the in-progress update process completes. If you continue to see this page after even passing a few minutes, then this is no ordinary screen, but an error screen. It indicates that an update which was being run by WordPress has not exited properly.

You don’t need to worry if you are facing this issue. Just follow the simple steps given below to fix it.

How to fix/resolve this issue:

There are two methods of fixing this “Another Update in Process” message screen issue.

Using Fix Another Update in Progress Plugin

First, the easiest one is by installing a WordPress plugin named Fix Another Update in Progress. Here is the link to its page: (Link).

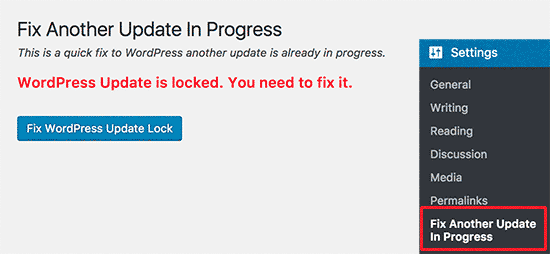
After Installing Fix Another Update in Progress plugin, Activate it and visit Settings > Fix Another Update in Progress page.

If the updates are locked due to malfunction, then you will see this screen.

Click on the Button saying “Fix WordPress Update Lock”. It will enable the Plugin to delete the required file to fix the issue. Once the issue is fixed, then you will see the below screen stating “There is no issue. Continue with your WordPress Update”.

This method of fixing the issue is recommended by our technical team. The second method explained below is not recommended especially for beginners.

Fix by Deleting the “core_update.lock” file manually:

Second, a tricky one is to get into your file system and manually deleting the file causing it.

To do this:

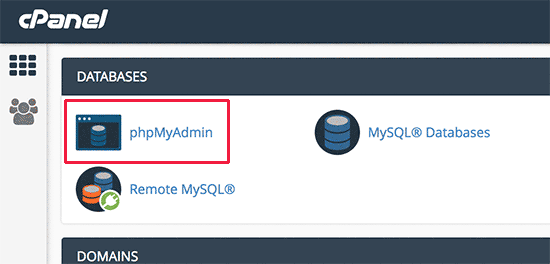
  • Go to your cPanel Dashboard of your Offshore Shared Web Hosting service, Offshore VPS Server, Offshore Dedicated Server or Offshore Streaming Dedicated server. After logging in to the cPanel account hosting the related website, go to phpMyAdmin located under DATABASES section of cPanel main page.
  • Now click on the browse button in the table next to wp-options in your database.
  • Now you need to find and Delete the row with the option name as “core_update.lock”. Once it has been deleted, you can go back to your WordPress website and process WordPress update.

Fixing “Another update is currently in progress.” is very simple if you choose to install a plugin. But, it can be tricky if you go for manually deleting the core_update.lock file. The main issue in manually deleting the file is to find it. Some of our clients have reported that they can not find the file, so in this case installing the plugins remains the only fix for them.

If you have any question regarding our Shared Web Hosting, VPS Servers, Dedicated Servers and Streaming Dedicated Servers, feel free to contact us via email or by opening a ticket via OffshoreDedicated.NET’s client portal.